Showing posts with label sewing. Show all posts

Friday, September 10, 2010

It's Done.. or Is it?


I finished the construction of this jacket today... I think. I ended up making it sort of a double breasted/wrap kinda thing because the pattern was way to generous to use buttons. Since I'm not great with patterns, I didn't realize just how huge it was going to be. I suppose if I wasn't too lazy, I could open the sides of the lining and the jacket and take it in. But, that would be a heck of a lot of work, and unpicking is a sure fire way for me to screw something up. I like the new closure, though something about the second picture looks off. It just kind of looks funky in the chest area. Maybe it's too plain.. or it's just a bad picture. I don't know. If someone has a suggestion about something I need to do here, I would love to hear it.
I'm not totally in love with the collar. In fact, I'm not even going to bother putting a button on it because it looks really odd when brought together in front.
The lining, however, is a silky polyester that I am totally in love with.
Would I recommend this pattern or make it again? Nah, probably not, but I feel better about sewing a major garment like this now. I also learned how helpful having a dress form would have been. It's really hard to take on and off and pin things on yourself while looking in the mirror.

Friday, August 6, 2010

A Sprinkle of Sparkle


Inspired by all the great man's shirt to skirt/dress projects out there on the interwebs, I wanted to give one a try myself. I really had in mind to make a skirt for me, but the little one made a pretty good case for a new skirt... so, you know how that goes.
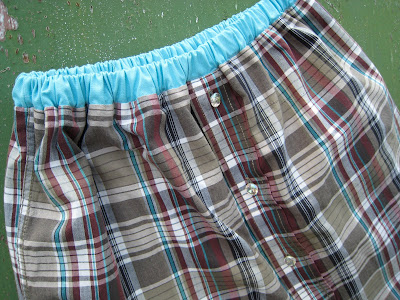
I took one of her daddy's old shirts, cut it just under the arms, added a contrast waistband w/elastic, sprinkled in some sparkly buttons, and bob's your uncle she has a new skirt.
I wanted to make it a little shorter, but the girl likes 'em long on account of her fear of anyone seeing her underpants.


Wednesday, July 7, 2010

Undaunted Sewing


I decided to get fearless and sew something for me. I've been following the Make It, Wear It series on Sew Mama Sew and decided to give a project a go. The Undaunted Top by JCasa looked just perfect!
Here are my thoughts on the whole thing:
First, this top makes me want to work on my arms. I try not to be hard on myself, but I've let some things go unchecked lately and I gotta quit that! I should have also made sure that I chose fabric that matches a camisole I already have. It really could use one underneath since the armholes are breezy.
About the pattern. It was super easy to follow and very forgiving. The original said it would fit a medium/large so I reduced the measurements on the pattern by 1 inch all the way around. After it was sewn, I curved in the sides about an inch or so more on either side (just eyeballed it). I also sewed the shoulder seams 3 inches instead of 4. That made the neck hang better I guess since I took in the measurements. I think if I were to make another, I would sew it all together and do the shirring last, or at least be more diligent about marking the shirring lines. You really can't tell when it's on, but the lines don't match up on the sides.
This was my first go at shirring. After a whole heck of a lot of trial and error, I found that the best way for me to get nice shirring was to wind the bobbin by machine and then set the tension pretty high. This is a knit fabric, so I also had to make sure I stretched it as it went through the machine. Once I figured it out it was easy peasey.
Anyway, thanks JCasa and SMS for the free pattern! I conquered my first top!

Thursday, December 3, 2009

Sweet Dreams Butterfly


"Sweet Dreams Butterfly" has always been a part of our bedtime ritual.
I hope she'll cherish this pillow forever... I will.

The embroidery pattern is by Vol.25 stitched with variegated thread.

Monday, November 30, 2009

Fabric Garland/Advent... with Tutorial

This year, I decided that we'd countdown to Christmas a little different.... without spending any money! I love, love fabric garlands so I thought that I would incorporate that idea into an advent calendar type thing. I made 25 links, put them in a pretty glass vase, and each day in December one link will get added until it looks like the picture above. I figured out that by the end of the second week, the chain will be long enough to drape nicely. Until then, they will just snake along the mantle.


If you'd like to make your own, here's what I did.

You'll need:
-(25) 4.5 x 12.5 in. pieces of fabric (I went with random scraps, but you could be more coordinated if you are so inclined.)
-(25) buttons (I let my daughter rummage through the buttons and pick them out.... shear 5 yr old girl heaven!)
-You could use a light interfacing if you want, but I didn't.... just starched them well instead.
-Your basics - needle, thread, scissors, rotary cutter, ruler

Once you get your fabric pieces all cut out, iron them in half lengthwise, right-sides together. Then, with a 1/2 inch seam allowance, sew up the long edge and one of the short sides. Clip the corner and trip the seam allowance. You've made a tube that looks like this:


Then, carefully turn your tube inside out. Be careful about using pointy things when turning, you don't want to poke a hole in your fabric. Once they are right side out, iron them well. To finish the other end, turn the raw edges in about a 1/2 inch and press. Use a teeny seam allowance to close it up. (hint: Start stitching on the folded side instead of the seam side. My machine likes it much better that way.)


Now here is where I had to really overcome a major fear.... buttonholes. If I can do it, so can you! Mine are not perfectly perfect by any means, but they work (glad my machine has good instructions). Here's one before I opened it up. See, not so perfect. I put the buttonholes on the "pretty" end, the one without machine stitching because that is the side you are going to see when you button them up.

Once you have that done, all you have to do is sew a button on the other end!.... Easy Peasy!
This entire project took me a few hours. The bulk of the time was spent choosing, cutting, and ironing the fabric.

Happy Holiday Crafting!!!


Thursday, July 16, 2009

Sewing for Myself...

I find it really hard to sew for myself. I really wrestle with all the details... color, texture, style, design, etc. I really needed a bag that would hold my work portfolio and laptop, and that would also serve as a good day travel bag (you know, something to keep all the mom stuff). Anyway, this is what I came up with. I went with a messenger style so that I can carry it on the bike. While I really like the way it looks, I'm pretty sure that I'm going to regret the fabric and strap choices. The main fabric is a really heavy linen and the adjustable strap is cotton webbing - certain to look filthy in a hurry. I really should have gone with black webbing, but I didn't have any on hand and that's just how lazy I was that day. See? Doggonit- I really like the bag and I'm still questioning myself! I wonder why it is that I can make stuff for other people without driving myself nuts.

Friday, July 10, 2009

Happy Day!

I am one happy advocate and happy seamstress on the same day!!!

That up there is a picture of one of the very first Share the Road signs ever to go up in Jonesboro, AR. YEEEEEHAW! After lots of drama with the sign maker and with the State of Arkansas, there are now bicycle signs up on one of the most heavily traveled bike routes in town.

And, this is my cute patoot modeling her new sundress. Not a huge challenge as it was a one seam job, but hey, it's something! Her response to the dress was the best... "I look sooo cute, and it's so long that I don't have to worry about showing my underpants!"


Saturday, March 21, 2009

A Quick Sewing Fix

I had a quick burst of creativity today, so I whipped up this little fabric basket. The outside is made out of a coffee bag that a friend of mine gave me. He works for Kona Cloud Coffee and hooked me up with some beautiful bags
If you are into coffee, you must try it.. A local doctor owns a coffee farm in Kona, ships it here, and it's roasted fresh in the back of the bike shop where my husband works.
For tutorials and inspiration for your own fabric basket, check out Sew,Mama,Sew.

Tuesday, February 17, 2009

I'm still here...

Wow. It's been a really long time since my last post! So what's been happening?..
Well, I've been really busy with the cycling advocacy group I'm starting. We're having our first meeting next Tuesday, and my oh my, it's getting overwhelming. So much to learn and so much I really want to get right. 
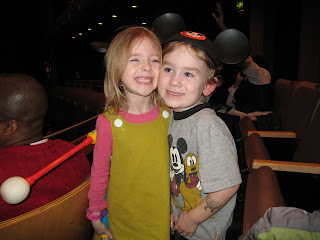
The little one had two firsts - her first ear infection and her first date. Yup, a date :)
Aren't they cute? The day before Valentine's Day, she and her buddy went to see Playhouse Disney Live, then had dinner, and a carriage ride (and everyone says "awwwww"). That wicked cute little green jumper she's wearing is from Brighton Early. I made her a pretty Valentine heart pin for the occasion. It's pinned down near the bottom of her dress. 
What else? Oh, yeah... the past week and a half, I've been working on another large jewelry roll order. Seven custom rolls for seven bridesmaids.  I finally got them finished up today. My sewing funk continues, though. It was like pulling teeth to get them finished. 

Monday, January 26, 2009

Playin' with dolls

This is Ruby, and she is a special little surprise for Taylor's 5th birthday. 
You can find the pattern to make a Ruby doll from One Red Robin.  

Friday, January 2, 2009

MacBook Gets a Home

First, Happy New Year!  I hope everyone had a wonderful holiday season. We had a very nice, relaxing time just hanging out. We did lots of cooking and baking and watching movies. 
Despite my complete apathy toward my shop lately, I was happy to take in a couple of custom orders this week. It was nice to do some work that didn't involve dishes or laundry.
Yesterday, I decided to do a little sewing just for the fun of it... imagine that! I made a spiffy new laptop cozie for the new MacBook (which I am in love with, btw). I used some thrifted wool blend fabric and some of the super cute fabric I won in last month's giveaway at Oh, Fransson. (In case you missed that post, I won a priority shipping box packed full of beautiful and fun fabrics!) The cozie is padded with some leftover batting from a quilting project that is in the works, but seems like I may never finish because I'm pretty sure that I got in way over my head. Anyway, now my 'puter will have a cozy/protective/cute place to stay when I take it around with me.  Sorry the pictures are so dark... I'm trying out new photo editing software and I haven't quite gotten it dialed in yet.


Friday, December 5, 2008

It's a Giveaway!

I want to pass along some good cheer, so I am hosting a giveaway. Hooray! To enter, all you have to do is comment on this post.  Say anything you want, just make sure that I have some way of getting in touch with you if you win. If you have a blog or even an etsy shop, that will do. I don't want to drag this out too long, so I'll end this thing Wednesday morning, the 10th, after I get the kiddo off to school (roughly 8a.m. Central time). I will use a random number generator and that post will win a super cute zippered pouch and a sweet little tissue holder. I made the items nice and light so I'm happy to ship internationally (although I'll likely have to leave the tissues out of the holder, sorry).  
  So get yourself entered and maybe you'll win a little something for yourself or something to give to a super lucky friend.  *One more thing - Through Wed., I'll offer you guys 15% off any purchase of $10 or more in my Etsy shop.  Just put "giveaway15" in the note to seller and I will send you a revised invoice through paypal for the adjusted total. If you'd rather not wait for me to send an invoice, you can pay the full amount and I will send you a partial refund, but you gotta leave me a message in the note to seller. :)

The zippered pouch is approx. 7 3/4" wide x 6 1/2" tall (20 x 16.5 cm).  The fabric is a dark brown linen blend topped with Ginger Blossom by Sandi Henderson.  The lining is a heavy, yet smooth muslin.  I also added some pretty sparkle with a button accent.  I would so carry this as a cute little clutch!
The tissue holder is made with fabric from Heather Bailey's Freshcut line and the same smooth muslin.  Again, I dipped into my button stash to add a little cuteness.


Special Gifts and Giveaways - Oh My!

This week has been very gifty.  On Wednesday, Sew Mama Sew hosted a giveaway day where lots and lots of crafty blogs held giveaways.... and I won one!!!  Oh, and you are gonna be jealous.  I won a box of beautiful fabric from Oh, Fransson one of my favorite blogs.  She is a super crafter and always has the most beautiful and fun projects going!  You must check her out.  But, the really exciting thing for you guys is that I want to keep the giving going so I'm tomorrow I'm going to host my own giveaway!!!  I don't know exactly what the gift will be yet, but I promise it will be worth checking out!

Yesterday, I mailed out my AREtsy secret santa gift.  I really love doing swaps.  I feel like I can really be creative, more so than when I'm creating for my shop.  I just hope she likes them!  I feel pretty safe posting a picture here because she should have it today and the chances of ruining the surprise are pretty slim I think.  So....
My person is getting this crafty little set of goodies.  The tissue holder is made with one of my favorite Japanese import fabrics, the house ornament is embroidered with that cute pattern from vol.25, and the little embroidered button pattern is from pimp stitch.  

Finally, the most special gift this week came from the big man himself - Santa.  I took Taylor to see Santa at the mall yesterday after school and she brought with her a teeny bell to give to Santa to give to Rudolf.  She sat on his lap and gave him the little bell and in return he gave her his bell.  How cool is that?!  The look on her face was absolutely priceless.  

Thursday, November 13, 2008

1 Down...


2 more to go!  I posted a while back about a set of floor cushions that I'm making and I wanted to post an update.  I got the first one finished!  Yay!  The picture is dark so it's hard to tell that the sides (and the bottom) are dark brown linen.  I'm pretty pleased with it, but it is far from perfect.  Putting all the pieces together went really smoothly until it came to putting on the bottom piece, then getting everything straight was a challenge.  I had to fudge a little bit, but it's not too noticeable.   I also left off the handle from the tutorial because they are pretty much going to stay parked in my living room.  They are also bigger - 19" square x 4" deep.  Taylor says the next one must have more pink. ;)  

Friday, October 24, 2008

Finally... A Crafting Day!

I have a serious thing for online crafty tutorials.  I've been eyeing this one for cushions from Sew Mama Sew for quite some time and decided today to give it a try.  I'm not finished yet, because I just had to make it more complicated by adding some quilting to it.  I thought, though, that I'd share the progress with you fine people.  Here is the top of one of three cushions.  I pieced the top out of some new and some vintage cottons and sort of quilted it to a piece of nice flannel to make it a little more durable.  They are 19" square and 4" deep.  They'll be floor cushions for the living room.  I'll be using the brown linen I used on my little houses pillows for the sides and bottom.

One of the things about this tutorial that just knocked my socks off is the part where she shows you how to magically make tons of bias tape out of a small square of fabric and then turn it into some super fab custom piping!  It's worth checking out just for that little gem.
Now, hopefully it will not be months and months before I can show you a cute stack of finished floor pillows!


Tuesday, October 7, 2008

Cute Houses

I have a thing for cute, colorful houses.. in real life and in art.  Last night I got to test out a new embroidery pattern by Jessica Rose of Vol 25.  She emailed me the set of patterns yesterday, and I just fell in love!  They are so cute and fun.  I immediately thought "row houses" and "pillow".I used bright colors and kept the stitching really simple and artfully imperfect to keep it feeling whimsical.  The border around the pillow is by Amy Butler (Wall Flowers in Mustard). The back and background fabric is chocolate brown linen.
Jessica has a couple of free patterns in her flickr group as well as pictures from other testers.  I can't wait to see what else she turns into embroidery patterns.  You should check out her other work.. fantastic it is!  She has a very lovely etsy shop.

Saturday, October 4, 2008

Birthdays

We are up to our necks in birthdays around here!  Thursday was my birthday.  On the great birthday scale, I would rate the day as "eh.".  It had some great moments, like my Dad coming up to visit, Jason and Taylor singing me "Happy Birthday" in the morning, and the most delicious cake ever that I made for myself.  It is my very very very favorite cake... and it looks just like the picture.  (Or, it did before we devoured it!)  There was other stuff that made the day, well, not so stellar, but that's all water under the bridge now.  I went out for a little retail therapy yesterday and that really did make me feel better.  Besides finding a cute pair of jeans that fit On Sale, I found these super ridiculously cute shoes at Target (I heart Target!).
It is also Taylor's very best buddy's birthday tomorrow.  The kid freakin' loves to dress up!  So, I made him his very own super hero cape.  I used the tutorial found on puking pastilles.  I was a little unsure of the how to draw out that shape exactly, so I made one out of paper first.  It's really like making a giant bib that you wear backwards.  I made my own applique from felt and the fabric of the cape is costume nylon that has a satin finish.  I wanted to do satin, but that stuff is so ravel-y and this sucker is going to get put through its paces, I'm sure.  Since you can't use a hot iron on this stuff I just glued the applique to the cape with fabric glue and then stitched it down by hand with embroidery thread for a cool border.
Next stop for today is a bowling party for some kid in Taylor's class.  

Saturday, August 23, 2008

A fun find

I rarely find anything really great when I go to flea markets and such, but I love to go looking anyway.  Yesterday, I had good luck.  I found a copy of Sewing Made Easy by Mary Lynch.  Not only is the writing and the language just hilarious (we're talking 1950 here), there is a ton of great information!  She covers everything from how to alter a pattern (the whens, whys and wheres) to how to sew the perfect drapes.  There is even an extensive section on choosing the right clothes and accessories for your body type.... I mean really "Never wear socks on the street in a city, unless you are in your teens."  Got that?  Ok.  
I've just about read this grand book from cover to cover and I can't think of anything that she's overlooked.  I really would like to start sewing more clothes for myself (If I can't buy great fitting pants, then I'll frickin' make some.) and I'm glad I now have Ms. Lynch at my side.  

Wednesday, August 13, 2008

Another project for little bit

I'm just popping in to share my latest project.... another little something for my little bit to take to school.   We're just a few days away from the big first day!  We went shopping today for a few last things (bag, lunchbox, and thermos). But, I just couldn't bring myself to buy a backpack from the store.... just couldn't do it.  So, off to Hancocks we went.  Taylor said she really wanted a messenger bag, so that's just what she got.  She picked out this super cute corduroy all by herself and decided that it must have her name stitched on it somewhere.  The name patch is fused on and then I just kinda went willy-nilly with the border stitching.  Kinda fun, I think.  I even went for an adjustable strap.  I'm not sure why I've always shied away from doing those; it was way easy.  There's nothing fancy inside, no pockets, and the flap closes with a magnetic snap.  
Oh, and we did buy a lunch box (pink camo) ... I thought about making it, though :)